Sunday, August 2, 2015

Review: Vital Proteins Collagen Peptides

For the past few weeks I've been putting two scoops of Vital Proteins' Collagen Peptides into my morning coffee. I know I don't get enough protein in my diet, and I want to jump start my metabolism first thing. However, I don't want to use protein loaded with crap like artificial sweeteners. Vital Proteins seemed to fit the bill with their collagen peptides, and I like the way they raise their cattle (the source of the collagen). According to their website:
Our cattle graze on lush grasslands in Brazil and are not given hormones, steroids, or antibiotics. They eat their natural diet – grass, and receive plenty of open space and sunshine. We believe in providing our animals with an environment that nature intended, and the result is a high quality protein that is natural and pure.
Just two scoops gives me 18g of extra protein. My coffee gets a sort of malty-quality to it from the peptides, but otherwise doesn't taste or "feel" much different! There are about 28 servings per container, so one container lasts about a month for me.

Not long into starting this peptide habit, not even two weeks, I noticed a few benefits:

  1. My normally brittle, flaky nails stopped flaking and breaking. I'm not used to having to cut my nails to keep them from getting too long! I have one particular problem nail: my thumbnail on my right hand. For the past ten years or so the tip would have a tendency to fracture in the same spot, requiring me to cut off everything that grew past the tip of the finger -- and sometimes more! I guess I have an unconscious tendency to press one of my other nails into that spot until it just fractures. This hasn't happened in weeks! In fact, that spot on the nail is a little more opaque than the rest of the nail, leading me to believe it's been fortified against future stress.
  2. My skin is a little more dewy or glowy looking without changing my skincare regimen.
Some other changes I've noticed may coincide with the protein and/or other habits I started (exercising more, incorporating yoga into my exercise routine, and nightly recounting "good things that happened" during the day). I figure I'll list these changes even though I can't prove correlation to any one thing.
  1. I don't freak out or overreact as easily as I used to. For instance, when something unplanned and unfortunate would happen, like spilling or breaking something, I used to fume about it, stomp my feet, and be generally miserable for a protracted period of time. Now I just shrug it off, deal with the cleanup without a second thought or fuss, and go on with my day. Whoa!
  2. I seem to sleep better. I have fewer instances of insomnia and tend to wake up less frequently in the night. That said, I have yet to have a night where I didn't wake up at least twice before morning! Vital Proteins does indicate this as one of the benefits of their peptides -- "Natural glycine improves sleep quality."
A final thing I've noticed: I get hungrier during the morning after having my coffee with the added protein. I like to think this means I'm being successful at jump starting my metabolism in the morning. Eating more has not led to weight gain, although I wouldn't be surprised if my lean mass has increased! Mind you, eating more for me is a granola bar or a Greek yogurt I otherwise wouldn't have eaten, not a whole extra feast.

I really like the containers. They are sturdy and substantial. I'll probably repurpose them.

I do own their gelatin as well but haven't had the opportunity to use it, besides a bulletproof coffee fail. Gelatin gels or solidifies when it cools, and I don't drink coffee quickly. I had a coffee gelatin mold as a result! Luckily, the peptides don't gel...

There are so many things you could use the gelatin for. I have some puddings, gummy snacks, and marshmallows in mind. For inspiration you can check out the company's recipe archive, which includes recipes for their peptides and their gelatin.

Please note: If you follow any of the links in this post and end up buying something from Vital Proteins, I actually get an incentive, which will go toward future replenishments of my protein supply. If you do intend to buy, please help a friend out and use one of my affiliate links, like the one for the image below. I figured I'd been talking the company up so much, I might as well get myself affiliate status with them!


Saturday, March 28, 2015

Overnight Crème Brûlée French Toast

I need to share this recipe with y’all. I modified it from a recipe on Allrecipes.com. (I needed to use up the cream I had left over from the Pi Day sweet potato pie and white chocolate crème brûlée I made earlier.)

I found this easier and tastier than my stuffed French toast. I could easily prepare this every Thursday night to make my Friday teleworking day that much sweeter!

Grammar and Cupcakes: Overnight Crème Brûlée French Toast


Overnight Crème Brûlée French Toast


Prep Time: 20 Minutes
Cook Time: 35-40 Minutes
Ready In: 9 Hours
Servings: 4

Ingredients:

½ cup unsalted butter
¾ cup coconut palm sugar (original recipe called for 1 cup packed brown sugar)
12 slices Pepperidge Farm swirl bread of your choice (or similar from a different brand)
3 eggs
1 cup heavy/whipping cream (you could get away with half & half if that's what you have on hand, but I can't promise it will be as decadent)
1 teaspoon vanilla extract
2 teaspoons brandy-based orange liqueur
(such as Grand Marnier® - I used Grand Marnier® Signature Collection N° 2 - Raspberry Peach)
¼ teaspoon salt

Directions:

1.
Melt butter in a small saucepan over medium heat. Mix in sugar, stirring until dissolved. Pour this caramel sauce into an 8x8 inch baking dish – the disposable foil type works well for this!
2.
Arrange four (4) stacks of bread, three (3) slices per stack, on top of the caramel sauce. In a small or medium bowl, whisk together eggs, cream, vanilla extract, orange brandy, and salt. Pour over the bread. Cover, and chill at least 8 hours, or overnight. (If the cream and egg mixture comes precariously close to the top of the pan, don’t worry! The bread absorbs much of the tasty goodness while chilling.)
3.
Preheat oven to 350 degrees F (175 degrees C). If using a glass baking dish, check the manufacturer’s instructions/warnings before putting the dish directly into the oven from the fridge. Bringing the dish to near-room-temperature before baking won’t hurt the recipe!
4.
Bake uncovered 35 to 40 minutes in the preheated oven, until puffed and lightly browned.
5.
Serve by inverting each stack onto a plate. The caramel sauce makes a nice, dark brown topping. Yum! If you have leftovers, they chill and reheat well!

Saturday, March 14, 2015

π - Sweet Potato Pie (Using Coconut Sugar) with Marshmallow Meringue Topping in A "Sugar Cookie" Crust

Last night, my husband asked me, "What are you baking tomorrow?"
I was like:
Huh?
(image found at: http://galleryhip.com/huh?-cat.html)
First I thought he was referring to my nephew's birthday, since he turned one year old today. But then I realized it: Pi Day. I figured it was a good excuse to make the sweet potato pie I didn't get around to making over the holidays.

The pie (Sweet Potato Pie with Marshmallow Meringue Topping) called for a graham cracker crust, but I hate graham cracker crust. I decided to make something like this sugar-cookie-esque crust instead.

In true Sarha fashion, I changed up the recipes.

Sweet Potato Pie (Using Coconut Sugar) with Marshmallow Meringue Topping in A "Sugar Cookie" Crust

Ingredients:
Crust:
3 large eggs
3 tablespoons white sugar
1 pinch salt
1 cup all-purpose flour
½ cup organic coconut flour
½ cup butter, cut into pieces

Sweet Potato Pie Filling:
3 cups canned sweet potatoes, drained and mashed
1 cup coconut palm sugar
1 cup whipping cream
3 large eggs
1 teaspoon vanilla extract
3/4 teaspoon ground cinnamon
1/4 teaspoon salt
Meringue Topping:
2 cups miniature marshmallows
1 tablespoon milk
2 egg whites
1/4 cup white sugar
1/2 teaspoon vanilla extract
1/4 teaspoon salt

Saturday, February 21, 2015

Homemade Greek Yogurt Using Just Milk and Probiotic Capsules

I bought the Instant Pot IP-DUO60 a while ago because it has a bunch of features I didn't have in any other appliances, like pressure cooking, steaming, rice cooking, and YOGURT MAKING. (If you're considering one, it's usually cheapest to buy it from the Instant Pot site and there's usually a coupon code. Also... they now have one with bluetooth so you can monitor it and change settings remotely. Why don't I have this in my life? Chances are I'd use this predominantly from the next room, but hey! I'm sure I'd find it helpful for non-lazy reasons as well.)

After some prolonged research about how to make your own Greek yogurt, I discovered it's actually pretty damn simple. For the yogurt, you just need milk (pasteurized whole milk is fine), live active cultures, and a way to keep the stuff consistently warm for about 8 hours. To make it Greek style, you need a method of straining the whey from the yogurt so it becomes thicker.

The hardest part for me to figure out was the amount of live active cultures to use. Instead of a dedicated yogurt starter or pre-made commercial yogurt, I wanted to use Bio-Kult probiotic capsules because they have a good diversity of live active cultures (14 strains!) and don't need to be refrigerated. I discovered they are packaged in blister pack sheets, which makes them extra convenient for the investment. I came across them because Wellness Mama recommended them for her probiotic marshmallows, which I hope to make one day.

After all of my research, I found no consistent recommendation for a ratio of probiotic to milk for yogurt. I found plenty of generalities varying from 2-4 capsules per quart of milk, but they didn't account for the amount of probiotic contained in each capsule, either mg or microorganisms per capsule. I decided to wing it and try 3 capsules, which is 432mg of Bio-Kult and a minimum of 6 billion microorganisms, with 4 cups regular whole milk. I think next time I use capsules I will only use 2 Bio-Kult because I had some digestive issues after eating the yogurt, so it may have been a little too strong, even though the dose as a daily supplement is two capsules. (I haven't taken them as a supplement.)

Making the Yogurt

I followed the instructions essentially made for my yogurt maker. For the sanitation and milk steaming step, I put one cup water in the pot, placed a Pyrex bowl filled with one quart milk on top of the steam tray, covered the pot, sealed it, and set the Steam function to 1 minute. When that function was done, I turned off the pot and eventually removed the lid. Once it cooled to 115 degrees F, it was time to add the probiotic. I took the Pyrex bowl out of the pot, removed the steam tray, and dumped the water.

If you go this route, learn from my naivety. There is probably going to be a slight milk skin on top of the container. You should remove this before you add the probiotic. I didn't, and I was afraid some of the probiotic was wasted and stuck in the skin that had gotten wrapped around my whisk.

For fear of being a klutz, I emptied three probiotic capsules into a small glass dish, and then added that to the steamed milk. If you're daring you can skip that middle step. I whisked it well, put it back in the Instant Pot (which had been emptied of water), covered the pot, sealed it, and activated the Yogurt function for eight hours.

I saw a few recommendations online not to disturb the yogurt by moving it, etc., because it could stop the bacterial fermentation process early.

Eight hours later, I opened the pot to find, well, yogurt! 
Yogurt

It seemed pretty thick already but I still strained it. To strain it, I put a plastic colander on top of a deep glass bowl. I then put this nut milk bag inside the colander and dumped the yogurt into the bag to drain. I did this on the counter, instead of the fridge, because I read that it drains faster at warmer temperatures. About an hour later I had drained plenty of whey. I scraped the yogurt into another Pyrex dish for storage, reserved a few teaspoons in a separate jar for inoculating a later batch of yogurt, poured the whey into a large jar, and put it all in the fridge.
Whey and Greek (Strained) Yogurt

Whey


The end product tasted phenomenal. I figured it would require sweetener since store bought plain yogurt is way too sour for me; however, it didn't require any sweetener! It was sweet enough on its own, and almost tasted like whipped cream. I'll never buy Chobani, Dannon, or Yoplait again! For just a few bucks I made yogurt with just two ingredients that tasted better than name brand. I will reduce the probiotic capsules to two next time to see if that is less troublesome for my stomach.

I have a new batch of yogurt in the yogurt maker right now, in which I used 4 teaspoons of the previous batch to inoculate the yogurt. I hope it comes out just as nicely. You can apparently use a prior batch a few times before needing to start with new probiotic, as long as the yogurt is fairly fresh, i.e. less than a week old. This Greatist.com post recommends "it’s best to create only six to eight batches from the original batch."

Additional Links!

Here are some additional sites I reviewed when researching how to make yogurt. Some of these sites also offer suggestions for non-dairy yogurt and alternate methods of making yogurt without a yogurt maker. If you don't find what you need here, make use of your Google-fu.


Saturday, December 27, 2014

For the love of pineapple upside down cheesecake...

In this post, you will get:


Wow, it's been almost a year since I posted. It's been a busy year, but don't worry, I'm still gainfully employed far, far away, still regularly going to the gym, etc. I just haven't had any time to cook or bake or post (see being gainfully employed far, far away). My dinners, if I make them, come from a freezer or a slow cooker paired with Campbell's Slow Cooker Sauces, and desserts come from the ice cream place or the bakery. (Don't judge. Cannoli doughnuts are fantastic.)

I took the day off from work on December 24 to make goodies for my family's annual "Appetizers and Desserts" Christmas Eve dinner, and especially to fulfill my husband's request for a pineapple upside down cheesecake for his Christmas Day birthday.

For "Appetizers and Desserts" I planned to make Baked Lava's Spumoni Cookies because my mom loves spumoni and I wanted to surprise her. I also planned to make deviled eggs (some spicy and some not) like I do every year.

You're not allowed to read cookbooks in my house. It's even more forbidden than using a laptop!

The Spumoni Cookies required a little effort, as in chopping up cherries and breaking up pistachios (I crushed them a handful at a time between two glass cutting boards) and making sure every cookie had some of each yummy mix-in. My main issue was having to go to the grocery store a second time on Christmas Eve (at noon!) because I didn't think to check the first time that I had enough butter. Who doesn't have a stock pile of butter? Me! It took me fifteen minutes to find a parking spot and aggressive, reckless drivers were trying to take me out every two feet. Next time I will make sure I have enough butter and the cookies will be no effort at all. (I'll also buy more parchment paper because I ran out on my first baking sheet and had to line the other two with wax paper that got super greasy.)

The Spumoni Cookies were a hit. Absolutely delicious and a great mix of textures and flavors. Plus they were festive!

Grammar and Cupcakes

To satisfy the "Appetizer" portion of the night, I made two types of deviled eggs: One with Jim Beam Bacon Mustard for those who can't eat spicy stuff, and the other with Hit & Run Brown Horseradish Mustard. Both were tasty! Last year the spicy eggs were made with Jolokia (Ghost Pepper) Mustard and they were fantastic. I have my Nom Nom Paleo Cookbook bookmarked to the page on Perfect Hard-Boiled Eggs for all my eggy needs. (I am not sure if these mustards are Paleo friendly, but I'm obviously not Paleo -- hence the cookies and cheesecake, oh my!)

 Grammar and CupcakesGrammar and Cupcakes

All right, so... The moment the internet has been waiting for (judging by the great lack of pineapple upside down cheesecake recipes):
Grammar and Cupcakes

Monday, January 13, 2014

First ever real Zumba class

Okay, so today I did my first ever non-virtual Zumba class that wasn't a demo. Is it normal to want to puke for hours after a class?

That makes 6 out of 8 required visits for January. It's January 13. I will knock out all of my required attendances by the second full week of the month. Not bad!

That's all, folks— Do something good for you today! ...Maybe even try something new.

Sunday, January 12, 2014

Biometrics assessed January 9, 2014

My job opened a new, ginormous gym with fitness classes, personal trainers, three salt water filtered pools (lap pool, therapy pool, and spa pool/hot tub), etc... My membership is $50 a month BUT I get $20 back per month on my pay check (quarterly) if I attend the gym 8+ times a month. I've gone 5 times in January. If I didn't live 60 miles away, I probably would have already attended over 8 times because I would have gone on weekend days.

As part of my membership, I meet with a personal trainer twice every 6-8 weeks, and with a nurse every 10-12 weeks for a biometric screening. 

I had my nurse assessment January 9th, and here were my stats:

Biometrics

Girth Extremities Calf L (in.): 13.5
Girth Extremities Calf R (in.): 14
Girth Extremities Thigh L (in.): 17.5
Girth Extremities Thigh R (in.): 16.5
Girth Extremities Forearm L (in.): 8.5
Girth Extremities Forearm R (in.): 8.2
Girth Extremities Biceps L (in.): 9.5
Girth Extremities Biceps R (in.): 10
Girth Hips (in.): 37.5

Girth Waist (in.): 27.5

Girth Abdomen (in.): 29

Girth Chest (in.): 33.5

Hip to Waist Ratio: 0.73

BMI: 20.8

Height (in.): 66

Weight (lbs – clothes on, evening): 128.7

Systolic BP: 120

Diastolic BP: 60

Heart Rate: 60 bpm

Body Composition

Direct Value Body Fat Percentage: 20.7%
Ideal Body Fat Percentage: 16-24%
Lean Body Mass: 102.3 lbs

Fat Body Mass: 26.6 lbs

Excess Body Fat: 0.0 lbs

Hydration: 60.3%
Ideal Hydration: 55-60%
Frame Size = Small (wrist 5.5”)


I'll post an update in 10-12 weeks!

I usually do cardio as a warm up — seated elliptical or stationary bike — then do resistance/strength training. Check my Fitocracy feed for workout details, and friend me!

I don't track calories. Calories are dangerous with my slightly obsessive/addictive personality. I try to eat healthy and in moderation. I generally don't drink soda or eat fast food, but sweets are my downfall!

My goals are to get stronger, be healthier, and have more energy. I also want to look awesome at my sister's wedding at the end of May.

I hope you have a healthy and happy 2014!

Saturday, September 1, 2012

eBay's August 30, 2012 ban of metaphysical services

When I learned yesterday that eBay banned tarot readings, spells, curses, and other such intangible metaphysical things, I honestly had never considered those things as "items" that would be sold on eBay. And then I was surprised at my rigid perception of eBay as a seller of physical (read: not purely spiritual) goods. Probably because the lack of control as to who could sell those things. And really, is there a way to check credentials other than positive or negative ratings? Are there credentials in the first place? Anyone can say they're the high priestess of such and such a coven, from a long line of powerful mediums from the islands of...

And thus I do understand eBay's reasoning to remove intangible metaphysical goods. Because John Smith can buy a spell, and a week later the waitress at the diner still hasn't fallen in love with him, and now he wants his money back. There's no way to prove a spell was actually performed (short of audio/video recording if it was a spoken or ritualistic spell), and—if you believe in spells—no way to prove the result of a spell as just manifesting in a way that wasn't expected. Maybe John wasn't specific enough in his request, and the schizophrenic waitress with a cocaine addiction and three illegitimate kids has fallen in love with him instead.

Luckily for eBay this isn't focused just on pagan metaphysics. Christian metaphysics fall under the category too—you can no longer buy prayers. (Really? You bought a prayer? Won't good natured Christians pray for the sake of helping their brethren?) While you and I may find the sale of certain spiritual things silly or ridiculous, this has been going on for hundreds of years, probably more—I can't remember that far back. People bought prayers for their dead relatives. People bought spells and amulets and potions to attract love or to ward off evil or the plague. I'd argue we still do that today... We buy insurance policies to protect us from unpredictable events, buy fancy clothes and cars and perfume to attract mates, buy all sorts of "miracle" gimmicks to help us lose weight...

Anyway. My problem with this is that this can grow into something that infringes on physical good sales on eBay or even influence other sites that would be more appropriate venues for metaphysical goods and services. 

As far as physical "metaphysical" goods go... Magic potions are banned. That's the only physical thing I see explicitly listed in eBay's 2012 Fall Seller Update. I've included the applicable areas from this document at the bottom of this post, but you can find it here: Category, Item Specifics and Catalog Updates

So, even though potions are the only physical metaphysical items listed... I have seen other publications on our good ol' Internet that eBay is targeting physical items with added metaphysical value (blessed items, charged items, etc.). While it's normal for those affected to freak out and over-exaggerate when it comes to things like this, Wired's article on the matter started off on a similar note. "Haunted gypsy rings, a portal to the realm of the immortals and creepy 40s dolls that promise to 'come alive' will soon have to find a new home [...]" 

These sentiments contradict a quote that has been floating around from eBay's spokesperson Johnna Hoff, which says "It's important to note that items that have a tangible value for the item itself and may also be used in metaphysical rites and practices (ie  jewelry, crystals, incense, candles, and books) are allowed in most cases." Most cases... Maybe they are right to freak out with that vague suffix. I know I'd like to be able to search for unique tarot decks on eBay in the future.

We're just talking about eBay right now, and I already said that they wouldn't be my first place to buy a tarot reading and the like. Then you realize that eBay owns PayPal. And then you further realize that many of the sites that are more appropriate for metaphysical services might utilize PayPal for payment...

It will be interesting to see how this grows. Regardless, I don't see why a "for entertainment purposes only" clause couldn't protect eBay from the consumer grief they're reacting to. If I'm buying a spell from someone I've never met, I know I'm taking a big (potentially dangerous) gamble.

Friday, July 13, 2012

W2 vs 1099

So lately I've ignored the distinction between W2 and 1099 employment. I've feigned indifference... Until I had a somewhat urgent request as to how I would choose to be paid. (Before any alarms start going off, no I haven't taken a new job or quit my old one, I'm just entertaining my prospects.) W2 paid 12% less than 1099.

So I tried to find a quick answer. I didn't like my Google results. I called my sister/CPA, who was at the gym and got back to me 10 minutes later assuming there was an emergency if I was calling her. (Who calls people anymore? Not I, unless I'm calling Grandma.) She seemed excited to run numbers, but needed specifics -- mainly differences in benefits, which I can't determine until Monday when I speak to someone more official.

My internet research that followed was very underwhelming. First, I couldn't find any information on benefits for the company I was speaking to, even though they're a bigger name company. I did find out that they seem to hire young people like myself (though greener out of college) and work them and abuse them to death.  The person I was speaking to seemed to confirm that in manner and with some verbal cues, though he pretended to be appreciative of his right out of college position. (Now I don't know how much bearing this would have on myself, being a contractor they were just placing, until I speak to that more official gentleman.) This company is also one that I have seen in a negative light since I helped interview one of their consultants for a potential position at my company, and my brain imploded from just how unskilled this person admitted to be for how much we were going to pay his company.

The 1099 vs. W2 thing seemed to weigh in favor of W2. W2 is safer because the employer withholds taxes for you and also matches the amount that's withheld. In 1099, no tax is withheld. You have to take care of that yourself by paying quarterly based on estimated income. You also have to take care of the portion the employer would usually pay, minus a small percent. In W2, money is paid toward unemployment by the employer. 1099 doesn't seem to offer unemployment protections, though I didn't research specifically for my state (NY). I could be wrong as information on this was sparse.

In 1099 you have more flexibility as far as deductions go (home office, business expenses), but you're also more likely to be audited. Hooray audits! In 1099 you're also less likely to receive employer subsidized benefits, since you're not actually an employee.

I don't know, the extra money and deduction benefits of 1099 seem to be outweighed by the risks. Any thoughts?

Saturday, March 3, 2012

Strength Training Like a Grrrl

I've been humoring the idea of strength training. As you know from my last post, I Zumba, and that's really my only formal exercise... Not to say it isn't awesome (because it is).

Today I decided to kick myself in the butt and get to it. I did the Beginner Body Weight Circuit Workout from NerdFitness (after warming up for five minutes by jumping rope and running in circles around my couch—classy).

My first run-through of the circuit, I was thinking, "this is nothing." My second run-through I started to change my mind, and toward the end I began telling myself not to do a third run-through. Well, I did the third one. Then I stretched for five minutes and logged my workout on Fitocracy.com, gaining mondo points. That's when I realized that I was 10 jump-squats away from completing a quest, and I hopped up and did 15. Way to overachieve.

Perhaps the most entertaining bit of this whole thing was my boy cat's reaction. He was watching me all concerned throughout my workout endeavors. He started rolling around into funny positions, apparently giving me his impression of my behavior. When I was struggling on my last rep of the plank, he said in his feline way, "Mommy, what's wrong? Here, I'll help you up," and leaned against me. Then he proceeded to follow me around the house in case of sudden death, probably with the hope of an eventual zombiecat snack. (It's really hard for him to reach my brains when I'm upright.) He nearly got one, too, because I fell over sideways at least twice when trying to do normal walking-type things.

Now I'm wondering what it's like to have energy. I'll definitely do the circuit again Monday or Tuesday, but I'll have to make sure I do it at night... So I can pass out after some protein intake and call it a day.

Speaking of protein, I made up a black bean meatloaf recipe the other day. I had ground beef in the fridge that needed to be used probably a few days sooner (oops) and wasn't in the mood for Hamburger Helper.

Easy Black Bean Meatloaf
Prep: 10 minutes
Cook: 1 hour
Total Time: 1 hour 10 minutes

Ingredients:
Barbecue sauce (I like Stubb's)
1.25-1.5 lbs ground beef
15 oz can black beans, drained
1 cup bread crumbs (I used Italian-seasoned bread crumbs)
1 large egg
1 cup milk

Prepare:
1. Preheat oven to 350 °F.
2. Spread some barbecue sauce on the bottom of a greased 5x9" loaf pan.
3. Mix the beef, beans, bread crumbs, egg and milk together in a large bowl. You might as well use your hands because they're going to get messy soon, anyway.
4. Press the mixture into the loaf pan. The barbecue sauce will creep up the sides of the loaf pan. If you really like barbecue sauce, you can spread some more on top. Be careful, though—it will bubble in the oven, so if you use a lot of sauce make sure you put your loaf pan on top of a cookie sheet to catch any drips.
5. Put meatloaf in pre-heated oven and cook for one hour. It may still be a little pink in the center at one hour, so cut your first piece from the center to make sure the color is to your liking. Or, better yet, stick an instant-read food thermometer in the center and make sure it's at least the USDA recommended 160 °F.

You can add chopped bell peppers, jalepeño peppers, sautéed onions, corn... Whatever veggies you like. I was feeling pretty lazy. This meatloaf is fairly healthy as far as meatloaves go, not having cheese and all.


And just so you guys don't think I'm straying from the cupcake arena, I made an oversized cupcake the other day. I used a dense vegan chocolate cake for the cake itself, then filled it with a not-so-vegan Oreo and cream cheese mixture, slapped some canned vanilla frosting on the top and covered that with crushed Oreos. Fancy.


Friday, February 24, 2012

Zumba

Today was my "day off" because I needed to work Sunday. My work phone rang at least 10 times. I received 4 voicemails. I spent about half an hour on the phone. The worst part was that the people who were repeatedly calling me KNEW I was off. So annoying. But heaven forbid I not return an "urgent" call on my day off.

Today was also my first time doing Zumba in the past few... weeks? I was sick, then I was injured, then I was crazy busy. I do Zumba at home on my PS3. I'd love to go to the local Zumba studio but I can't justify throwing away that kind of money. $10 per class or I think it was somewhere between $50-100 per month? Yes, Golds Gym has Zumba for less $$, but the folks at Studio Ayo hooked me when they did a introductory session at the hospital and I think any other class at any other gym would disappoint me after that.

So today, not having truly exercised in weeks, I did one of the "intermediate" 45 minute classes on my PS3. I have a weak lower back from a car accident in '08, and I aggravated it in my trip-and-fall. The past few days it's left me apparently walking funny (I was told by coworkers that I was walking "like I had scoliosis" and that I was "walking crooked") which I attribute to a shorter stride length from right-sided pain/stiffness in my lower back. So it wasn't the EASIEST workout I've ever forced myself to complete, not that it was painful either, but it was very annoying to keep hearing my work phone ring and be taken out of my groove. Zumba calms me, and my phone ringing when I'm Zumba-ing does the opposite.

I attribute Zumba and drinking a glass of red wine several nights a week to an extreme drop in my cholesterol. In college my cholesterol was at 266 and I was only about 10 pounds heavier than I am now. October 2010 it was 206. November 2011 it was 191. January 2012 it was... 154!!! Even better, the first two (college/2010) were done fasting, but the very recent ones were non-fasting, meaning the true values are probably lower. (Though both times the only cholesterol I would have consumed at that point would have been in my coffee creamer.) I hope I haven't reversed my cholesterol improvement with not exercising.

The Zumba game's music selection can get boring. Not having DLC makes it worse. But I also still can't justify paying ridiculous $$ for a class at a studio, even though it would be far more entertaining.

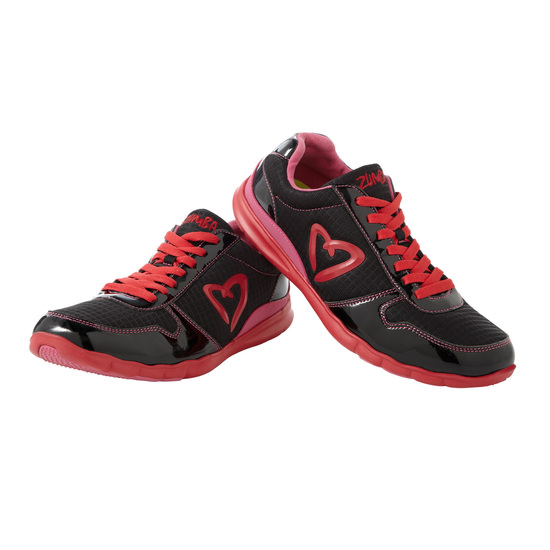
In writing this post I discovered the Zumba website and store, complete with the pictured shoes.

Now, for some cupcake goodness:
These little devils are banana cupcakes with peanut butter frosting, and their fancier companions with Nutella in the cake and in the frosting. I needed to use two overripe bananas, so I mixed up a box of light yellow vanilla cake mix and added the banana mush. I think I added a dash of vanilla extract too. Half of them I added a spoon of Nutella to. (The Nutella will sink to the bottom but that's okay.) Once they were cooled, I mixed up some homemade peanut butter frosting using this recipe, and added a dab of Nutella to the tops of the ones with Nutella in the cake. I halved the frosting recipe and didn't need to use any milk. It covered exactly two dozen cakes. Yum! They lasted about 5 days on the counter, then the cake began to taste less fresh.

Thursday, February 2, 2012

Welcome! Have an awesome Taco Pasta recipe!

All right, I've been itching to reinvent this blog. There's no better time than when I'm home waiting for my nails to dry and trying not to put weight on my foot. (Funny story: I got injured—not broken bone injured, probably more sprained-ankle and muscle spasm injured—at work today. And when I tried to file the accident report on the electronic accident reporting system, I wasn't IN the system. Neither was my department, or the area of the hospital I got injured in. And in true bureaucratic fashion, I couldn't free-text those required fields.) I'm hoping it's better tomorrow; I'm supposed to be going to an event that I drive 100 miles to go to the first Friday of every month to dress in funky outfits and dance the night away!

So... Since this blog has a foody name, I'll give you a foody post. Here's one of my tastiest and simplest recipes:


Simple Taco Pasta

Prep Time: 20 Minutes
Ready In: 50 Minutes
Bake Time: 30 Minutes
Servings: About 12

Combine simple ingredients for a gooey, cheesy, spicy, sort-of-crunchy, satisfying meal. This recipe utilizes YOUR favorite textured pasta, taco seasoning, and taco sauce. You also get to choose between cream cheese and lower-fat Neufchatel. (The reason for using textured pasta is to trap or hold the beef and cheese.) It keeps and reheats well… but tends to get spicier over time. Enjoy!


Ingredients:

1 ¼ lb lean ground beef
1 lb of your favorite short, textured pasta (e.g. medium shells or campanelle)
1 8oz pkg cream cheese or Neufchatel
1 packet of your favorite taco seasoning (e.g. jalapeño and onion)
1 8oz jar of your favorite taco sauce
2 cups shredded Mexican cheese blend
1 ½ cups crushed tortilla chips
Optional: Taco garnishes (sliced olives, sliced jalapeños, sour cream, etc.)

Directions:

1. Bring large pot of water to a boil (salt lightly if desired). Once boiling, add 1 lb textured pasta to water and cook 8-10 minutes, or until al dente (firm but not hard). Drain and return to pot.

2. While preparing the pasta, brown beef in a large skillet until no longer pink. Drain. Add cream cheese or Neufchatel and taco seasoning; mix and simmer for 5 minutes. (You can make this step easier by using room temperature cream cheese/Neufchatel that’s been chopped into chunks, but that’s not necessary.)

3. Preheat oven to 350 degrees F.

4. Spread a thin layer of taco sauce on the bottom of a 13x9 inch baking dish. Reserve remaining taco sauce for later.

5. Once the beef mixture is done simmering and the pasta has been returned to its pot, add the beef mixture to the pasta and mix well.

6. Spread the pasta mixture evenly across the 13x9 inch baking dish. Pour the remaining taco sauce over the pasta. Cover dish with foil and bake in preheated oven for 15 minutes.

7. Remove dish from oven, remove foil, and top with Mexican cheese and crushed tortilla chips. (You don’t need exactly 1 ½ cups of chips – just crumble tortilla chips over the pasta until it is well-covered.) Return dish to oven for 15 more minutes.

8. Remove from oven and serve. Optionally, you can add your favorite taco garnishes or let people top their own.


Let me know what you think. (=