Showing posts with label recipe. Show all posts

Saturday, February 21, 2015

Homemade Greek Yogurt Using Just Milk and Probiotic Capsules

I bought the Instant Pot IP-DUO60 a while ago because it has a bunch of features I didn't have in any other appliances, like pressure cooking, steaming, rice cooking, and YOGURT MAKING. (If you're considering one, it's usually cheapest to buy it from the Instant Pot site and there's usually a coupon code. Also... they now have one with bluetooth so you can monitor it and change settings remotely. Why don't I have this in my life? Chances are I'd use this predominantly from the next room, but hey! I'm sure I'd find it helpful for non-lazy reasons as well.)

After some prolonged research about how to make your own Greek yogurt, I discovered it's actually pretty damn simple. For the yogurt, you just need milk (pasteurized whole milk is fine), live active cultures, and a way to keep the stuff consistently warm for about 8 hours. To make it Greek style, you need a method of straining the whey from the yogurt so it becomes thicker.

The hardest part for me to figure out was the amount of live active cultures to use. Instead of a dedicated yogurt starter or pre-made commercial yogurt, I wanted to use Bio-Kult probiotic capsules because they have a good diversity of live active cultures (14 strains!) and don't need to be refrigerated. I discovered they are packaged in blister pack sheets, which makes them extra convenient for the investment. I came across them because Wellness Mama recommended them for her probiotic marshmallows, which I hope to make one day.

After all of my research, I found no consistent recommendation for a ratio of probiotic to milk for yogurt. I found plenty of generalities varying from 2-4 capsules per quart of milk, but they didn't account for the amount of probiotic contained in each capsule, either mg or microorganisms per capsule. I decided to wing it and try 3 capsules, which is 432mg of Bio-Kult and a minimum of 6 billion microorganisms, with 4 cups regular whole milk. I think next time I use capsules I will only use 2 Bio-Kult because I had some digestive issues after eating the yogurt, so it may have been a little too strong, even though the dose as a daily supplement is two capsules. (I haven't taken them as a supplement.)

Making the Yogurt

I followed the instructions essentially made for my yogurt maker. For the sanitation and milk steaming step, I put one cup water in the pot, placed a Pyrex bowl filled with one quart milk on top of the steam tray, covered the pot, sealed it, and set the Steam function to 1 minute. When that function was done, I turned off the pot and eventually removed the lid. Once it cooled to 115 degrees F, it was time to add the probiotic. I took the Pyrex bowl out of the pot, removed the steam tray, and dumped the water.

If you go this route, learn from my naivety. There is probably going to be a slight milk skin on top of the container. You should remove this before you add the probiotic. I didn't, and I was afraid some of the probiotic was wasted and stuck in the skin that had gotten wrapped around my whisk.

For fear of being a klutz, I emptied three probiotic capsules into a small glass dish, and then added that to the steamed milk. If you're daring you can skip that middle step. I whisked it well, put it back in the Instant Pot (which had been emptied of water), covered the pot, sealed it, and activated the Yogurt function for eight hours.

I saw a few recommendations online not to disturb the yogurt by moving it, etc., because it could stop the bacterial fermentation process early.

Eight hours later, I opened the pot to find, well, yogurt! 
Yogurt

It seemed pretty thick already but I still strained it. To strain it, I put a plastic colander on top of a deep glass bowl. I then put this nut milk bag inside the colander and dumped the yogurt into the bag to drain. I did this on the counter, instead of the fridge, because I read that it drains faster at warmer temperatures. About an hour later I had drained plenty of whey. I scraped the yogurt into another Pyrex dish for storage, reserved a few teaspoons in a separate jar for inoculating a later batch of yogurt, poured the whey into a large jar, and put it all in the fridge.
Whey and Greek (Strained) Yogurt

Whey


The end product tasted phenomenal. I figured it would require sweetener since store bought plain yogurt is way too sour for me; however, it didn't require any sweetener! It was sweet enough on its own, and almost tasted like whipped cream. I'll never buy Chobani, Dannon, or Yoplait again! For just a few bucks I made yogurt with just two ingredients that tasted better than name brand. I will reduce the probiotic capsules to two next time to see if that is less troublesome for my stomach.

I have a new batch of yogurt in the yogurt maker right now, in which I used 4 teaspoons of the previous batch to inoculate the yogurt. I hope it comes out just as nicely. You can apparently use a prior batch a few times before needing to start with new probiotic, as long as the yogurt is fairly fresh, i.e. less than a week old. This Greatist.com post recommends "it’s best to create only six to eight batches from the original batch."

Additional Links!

Here are some additional sites I reviewed when researching how to make yogurt. Some of these sites also offer suggestions for non-dairy yogurt and alternate methods of making yogurt without a yogurt maker. If you don't find what you need here, make use of your Google-fu.



Saturday, March 3, 2012

Strength Training Like a Grrrl

I've been humoring the idea of strength training. As you know from my last post, I Zumba, and that's really my only formal exercise... Not to say it isn't awesome (because it is).

Today I decided to kick myself in the butt and get to it. I did the Beginner Body Weight Circuit Workout from NerdFitness (after warming up for five minutes by jumping rope and running in circles around my couch—classy).

My first run-through of the circuit, I was thinking, "this is nothing." My second run-through I started to change my mind, and toward the end I began telling myself not to do a third run-through. Well, I did the third one. Then I stretched for five minutes and logged my workout on Fitocracy.com, gaining mondo points. That's when I realized that I was 10 jump-squats away from completing a quest, and I hopped up and did 15. Way to overachieve.

Perhaps the most entertaining bit of this whole thing was my boy cat's reaction. He was watching me all concerned throughout my workout endeavors. He started rolling around into funny positions, apparently giving me his impression of my behavior. When I was struggling on my last rep of the plank, he said in his feline way, "Mommy, what's wrong? Here, I'll help you up," and leaned against me. Then he proceeded to follow me around the house in case of sudden death, probably with the hope of an eventual zombiecat snack. (It's really hard for him to reach my brains when I'm upright.) He nearly got one, too, because I fell over sideways at least twice when trying to do normal walking-type things.

Now I'm wondering what it's like to have energy. I'll definitely do the circuit again Monday or Tuesday, but I'll have to make sure I do it at night... So I can pass out after some protein intake and call it a day.

Speaking of protein, I made up a black bean meatloaf recipe the other day. I had ground beef in the fridge that needed to be used probably a few days sooner (oops) and wasn't in the mood for Hamburger Helper.

Easy Black Bean Meatloaf
Prep: 10 minutes
Cook: 1 hour
Total Time: 1 hour 10 minutes

Ingredients:
Barbecue sauce (I like Stubb's)
1.25-1.5 lbs ground beef
15 oz can black beans, drained
1 cup bread crumbs (I used Italian-seasoned bread crumbs)
1 large egg
1 cup milk

Prepare:
1. Preheat oven to 350 °F.
2. Spread some barbecue sauce on the bottom of a greased 5x9" loaf pan.
3. Mix the beef, beans, bread crumbs, egg and milk together in a large bowl. You might as well use your hands because they're going to get messy soon, anyway.
4. Press the mixture into the loaf pan. The barbecue sauce will creep up the sides of the loaf pan. If you really like barbecue sauce, you can spread some more on top. Be careful, though—it will bubble in the oven, so if you use a lot of sauce make sure you put your loaf pan on top of a cookie sheet to catch any drips.
5. Put meatloaf in pre-heated oven and cook for one hour. It may still be a little pink in the center at one hour, so cut your first piece from the center to make sure the color is to your liking. Or, better yet, stick an instant-read food thermometer in the center and make sure it's at least the USDA recommended 160 °F.

You can add chopped bell peppers, jalepeño peppers, sautéed onions, corn... Whatever veggies you like. I was feeling pretty lazy. This meatloaf is fairly healthy as far as meatloaves go, not having cheese and all.


And just so you guys don't think I'm straying from the cupcake arena, I made an oversized cupcake the other day. I used a dense vegan chocolate cake for the cake itself, then filled it with a not-so-vegan Oreo and cream cheese mixture, slapped some canned vanilla frosting on the top and covered that with crushed Oreos. Fancy.


Friday, February 24, 2012

Zumba

Today was my "day off" because I needed to work Sunday. My work phone rang at least 10 times. I received 4 voicemails. I spent about half an hour on the phone. The worst part was that the people who were repeatedly calling me KNEW I was off. So annoying. But heaven forbid I not return an "urgent" call on my day off.

Today was also my first time doing Zumba in the past few... weeks? I was sick, then I was injured, then I was crazy busy. I do Zumba at home on my PS3. I'd love to go to the local Zumba studio but I can't justify throwing away that kind of money. $10 per class or I think it was somewhere between $50-100 per month? Yes, Golds Gym has Zumba for less $$, but the folks at Studio Ayo hooked me when they did a introductory session at the hospital and I think any other class at any other gym would disappoint me after that.

So today, not having truly exercised in weeks, I did one of the "intermediate" 45 minute classes on my PS3. I have a weak lower back from a car accident in '08, and I aggravated it in my trip-and-fall. The past few days it's left me apparently walking funny (I was told by coworkers that I was walking "like I had scoliosis" and that I was "walking crooked") which I attribute to a shorter stride length from right-sided pain/stiffness in my lower back. So it wasn't the EASIEST workout I've ever forced myself to complete, not that it was painful either, but it was very annoying to keep hearing my work phone ring and be taken out of my groove. Zumba calms me, and my phone ringing when I'm Zumba-ing does the opposite.

I attribute Zumba and drinking a glass of red wine several nights a week to an extreme drop in my cholesterol. In college my cholesterol was at 266 and I was only about 10 pounds heavier than I am now. October 2010 it was 206. November 2011 it was 191. January 2012 it was... 154!!! Even better, the first two (college/2010) were done fasting, but the very recent ones were non-fasting, meaning the true values are probably lower. (Though both times the only cholesterol I would have consumed at that point would have been in my coffee creamer.) I hope I haven't reversed my cholesterol improvement with not exercising.

The Zumba game's music selection can get boring. Not having DLC makes it worse. But I also still can't justify paying ridiculous $$ for a class at a studio, even though it would be far more entertaining.

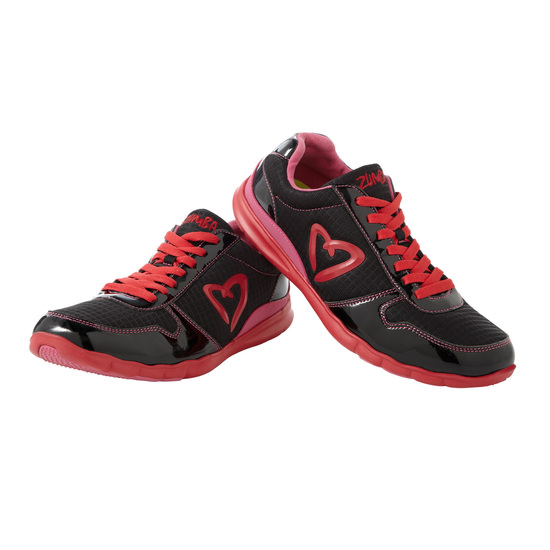
In writing this post I discovered the Zumba website and store, complete with the pictured shoes.

Now, for some cupcake goodness:
These little devils are banana cupcakes with peanut butter frosting, and their fancier companions with Nutella in the cake and in the frosting. I needed to use two overripe bananas, so I mixed up a box of light yellow vanilla cake mix and added the banana mush. I think I added a dash of vanilla extract too. Half of them I added a spoon of Nutella to. (The Nutella will sink to the bottom but that's okay.) Once they were cooled, I mixed up some homemade peanut butter frosting using this recipe, and added a dab of Nutella to the tops of the ones with Nutella in the cake. I halved the frosting recipe and didn't need to use any milk. It covered exactly two dozen cakes. Yum! They lasted about 5 days on the counter, then the cake began to taste less fresh.

Thursday, February 2, 2012

Welcome! Have an awesome Taco Pasta recipe!

All right, I've been itching to reinvent this blog. There's no better time than when I'm home waiting for my nails to dry and trying not to put weight on my foot. (Funny story: I got injured—not broken bone injured, probably more sprained-ankle and muscle spasm injured—at work today. And when I tried to file the accident report on the electronic accident reporting system, I wasn't IN the system. Neither was my department, or the area of the hospital I got injured in. And in true bureaucratic fashion, I couldn't free-text those required fields.) I'm hoping it's better tomorrow; I'm supposed to be going to an event that I drive 100 miles to go to the first Friday of every month to dress in funky outfits and dance the night away!

So... Since this blog has a foody name, I'll give you a foody post. Here's one of my tastiest and simplest recipes:


Simple Taco Pasta

Prep Time: 20 Minutes
Ready In: 50 Minutes
Bake Time: 30 Minutes
Servings: About 12

Combine simple ingredients for a gooey, cheesy, spicy, sort-of-crunchy, satisfying meal. This recipe utilizes YOUR favorite textured pasta, taco seasoning, and taco sauce. You also get to choose between cream cheese and lower-fat Neufchatel. (The reason for using textured pasta is to trap or hold the beef and cheese.) It keeps and reheats well… but tends to get spicier over time. Enjoy!


Ingredients:

1 ¼ lb lean ground beef
1 lb of your favorite short, textured pasta (e.g. medium shells or campanelle)
1 8oz pkg cream cheese or Neufchatel
1 packet of your favorite taco seasoning (e.g. jalapeño and onion)
1 8oz jar of your favorite taco sauce
2 cups shredded Mexican cheese blend
1 ½ cups crushed tortilla chips
Optional: Taco garnishes (sliced olives, sliced jalapeños, sour cream, etc.)

Directions:

1. Bring large pot of water to a boil (salt lightly if desired). Once boiling, add 1 lb textured pasta to water and cook 8-10 minutes, or until al dente (firm but not hard). Drain and return to pot.

2. While preparing the pasta, brown beef in a large skillet until no longer pink. Drain. Add cream cheese or Neufchatel and taco seasoning; mix and simmer for 5 minutes. (You can make this step easier by using room temperature cream cheese/Neufchatel that’s been chopped into chunks, but that’s not necessary.)

3. Preheat oven to 350 degrees F.

4. Spread a thin layer of taco sauce on the bottom of a 13x9 inch baking dish. Reserve remaining taco sauce for later.

5. Once the beef mixture is done simmering and the pasta has been returned to its pot, add the beef mixture to the pasta and mix well.

6. Spread the pasta mixture evenly across the 13x9 inch baking dish. Pour the remaining taco sauce over the pasta. Cover dish with foil and bake in preheated oven for 15 minutes.

7. Remove dish from oven, remove foil, and top with Mexican cheese and crushed tortilla chips. (You don’t need exactly 1 ½ cups of chips – just crumble tortilla chips over the pasta until it is well-covered.) Return dish to oven for 15 more minutes.

8. Remove from oven and serve. Optionally, you can add your favorite taco garnishes or let people top their own.


Let me know what you think. (=